


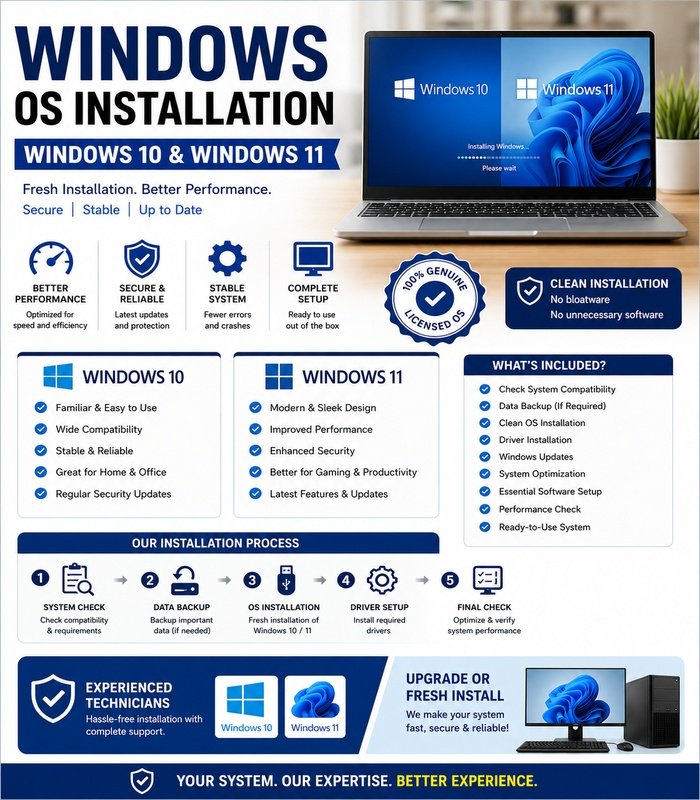
Windows OS installation 10 & 11
Install Windows
₹499.00
Guaranteed Safe Checkout

Features & Compatibility
Installing or reinstalling Windows can feel like a small leap of faith—choose the right files, press a few buttons, and a fresh operating environment appears. This guide walks you through the whole journey for Windows 10 and Windows 11, from planning and Backup & Formatting to activation and fine-tuning afterward. I’ll explain differences between the two releases, show the steps that matter, and share practical troubleshooting tips so you don’t get stuck halfway through.
Understanding what you’re installing
An Operating System is, simply put, the software that manages hardware, runs applications, and presents the interface you interact with. Windows 10 and Windows 11 share many core features, but Windows 11 introduces stricter hardware checks, a redesigned interface, and some security defaults that affect installation choices. Knowing these distinctions before you begin prevents surprises when the installer asks for secure boot or TPM 2.0.
Beyond the technical differences, consider the user experience you want. Windows 10 remains a solid, compatible choice for older hardware or legacy applications, while Windows 11 targets newer machines and a more modern workflow. Your decision will guide whether you perform a fresh Installation, an in-place upgrade, or keep an older setup with targeted updates.
System requirements and hardware checks
Before you download installation media, verify that your PC meets minimum system requirements. Missing one key component can halt the process or produce a suboptimal experience after setup. Hardware compatibility affects installation method, driver availability, and system stability later on.
Below is a concise comparison to highlight critical differences that commonly affect installation planning.
| Item | Windows 10 (typical) | Windows 11 (typical) |
|---|---|---|
| Processor | 1 GHz or faster, 1+ cores | 1 GHz or faster, 2+ cores; 64-bit only |
| RAM | 1 GB (32-bit) / 2 GB (64-bit) | 4 GB minimum |
| Storage | 16 GB (32-bit) / 20 GB (64-bit) | 64 GB minimum |
| Firmware | BIOS or UEFI | UEFI and Secure Boot supported |
| Security | Optional TPM | TPM 2.0 required (commonly enforced) |
| Graphics | DirectX 9 or later | DirectX 12 compatible GPU recommended |
These are baseline numbers; manufacturers and specific features can demand more. If your PC sits near the minimums, consider whether new hardware will serve you better than retrofitting software settings.
Preparing your machine: backup & formatting and licensing considerations
Preparation is the single most important phase. A reliable Backup & Formatting strategy protects your files and lets you start fresh without losing documents, photos, and app settings you need. Always assume data loss is possible during a reinstallation; that mindset changes the way you approach copying files and preserving licenses.
Create at least two backups: a file-level copy of essential documents and a system image if you want a snapshot to return to. For the former, cloud storage or an external drive works well. For a full image, use a disk-imaging tool and store the image on a separate physical drive to avoid overwriting during formatting.
On licensing: you will need a Genuine Windows Key to activate Windows after a clean install unless your device has a digital license tied to its hardware. Keep your current product key, Microsoft account credentials, and any OEM paperwork handy. If you’re upgrading from a valid Windows 10 license to Windows 11, activation often transfers automatically, but it’s wise to have the key on hand.
Deciding between a clean install and an upgrade
A clean install wipes the drive, removes accumulated cruft, and often results in better performance. It also requires more preparation: you must back up applications and settings and reinstall programs afterward. For many technicians and power users, a clean Installation is the preferred route when changing major versions or starting with a refurbished machine.
An in-place upgrade keeps your files, apps, and settings intact and is faster to perform. It’s ideal if you have many applications that are difficult to reinstall or if you want to preserve a configured environment. The tradeoff is that leftover drivers and settings from the prior installation can carry over problems.
If you’re unsure, I recommend creating a full backup and testing the upgrade path first. If anything goes wrong, the backup lets you return to the previous state. This two-step approach reduces risk and gives you confidence to proceed with a clean wipe later if desired.
Creating installation media
Microsoft provides official tools to create bootable USB installation media for both Windows 10 and Windows 11. Using official media reduces the chance of corrupted files or malicious packages. A USB drive of 8 GB or larger is usually sufficient; format it before creating media to avoid conflicts.
Follow a straightforward process: download the Media Creation Tool for Windows 10 or the Installation Assistant/media image for Windows 11, run the tool, and choose the USB option. If you prefer, download an ISO and use Rufus or the Windows USB/DVD Download Tool to create the bootable drive. Keep an eye on architecture choices—64-bit vs 32-bit—and regional language settings.
When creating media for multiple machines, label the drive clearly and include a small README file with the date and Windows build. That tiny habit saves time when you return to the USB months later. Finally, test the USB on a secondary machine to confirm it boots to the installer before you touch your primary PC.
BIOS/UEFI configuration: secure boot, TPM, and boot order
Modern Windows installations require interaction with UEFI firmware settings more often than older BIOS setups. Access UEFI during startup—usually by pressing keys like F2, Del, or Esc—and verify that Secure Boot and TPM settings match the requirements of the chosen version. Windows 11 expects TPM 2.0 and Secure Boot enabled in most supported scenarios.
Change the boot order so the PC tries the USB drive before the internal disk. Save settings and restart; the machine should boot to the installer. If it returns to the operating system instead, re-enter UEFI and double-check the boot priority. On some laptops, a temporary boot menu key lets you pick the USB device without altering firmware settings permanently.
Be cautious when toggling CSM or legacy mode; enabling legacy BIOS compatibility can make drives appear differently and sometimes block activation of Secure Boot. If you plan to dual-boot or maintain older software, document any firmware changes so you can revert them later without confusion.
Step-by-step installation flow
Once your media boots, the sequence is predictable but worth understanding before you click through prompts. The installer asks for language and keyboard preferences, then displays options to upgrade or perform a custom installation. For a clean Installation, choose custom and select the target drive or partition.
During partition selection, you can delete existing partitions to trigger a full format, or create new partitions to split the drive for data or multiple OSs. After you confirm, the installer copies files, installs features and drivers, and reboots several times. This stage is mostly automated but can take from 20 minutes to over an hour depending on hardware speed and updates applied.
If prompted for a product key during installation and you don’t have one, you can often skip this step and activate Windows later. For organizational deployments, use a key management solution or a digital license linked to your Microsoft account to streamline activation after setup.
Partitioning and formatting best practices
Partitioning strategy affects recoverability and performance. A simple two-part layout—one partition for the OS and one for personal data—makes future reinstalls easier because you can format the system partition without touching user files. For NVMe and SSD systems, align partitions properly (most modern installers handle alignment automatically) and leave some reserve free space for over-provisioning.
Formatting during Installation uses NTFS for system partitions by default. If you plan to use BitLocker, consider leaving a small unencrypted system partition for boot files and a primary encrypted partition for Windows. If you use multiple drives, place pagefile or frequently written temporary data on a secondary drive only when necessary to reduce wear on small SSDs.
For advanced scenarios—dual boot with Linux, multiple Windows installs, or custom recovery partitions—create a small recovery partition of at least 500 MB and label it clearly. Proper partition naming and documentation help avoid costly mistakes later when a quick reinstall seems reasonable but wipes essential data instead.
Post-install activation and Genuine Windows Key handling
Activation can be automatic if Microsoft recognizes a digital license tied to your hardware or Microsoft account. If it does not, you will need a Genuine Windows Key to activate the installation. Enter the key in Settings > Update & Security > Activation or during setup if prompted.
If you have a product key from a previous installation, it may still activate depending on licensing rules and whether the previous license was retail or OEM. Retail keys can move between machines more freely; OEM keys are usually tied to the original hardware. For organization deployments, use volume licensing or key management services to maintain compliance without manual activation on each machine.
Keep a record of your activation status and the Genuine Windows Key in a secure place. If activation fails, gather diagnostic details (error codes, hardware changes) before contacting Microsoft support; these details speed resolution and reduce downtime.
Drivers, updates, and first-run tasks
After the installer finishes, Windows Update is your first line of defense for drivers and system updates. Run Windows Update several times until no updates remain, and reboot as requested. Manufacturers often provide newer or more optimized drivers on their support sites, particularly for graphics, chipsets, and network adapters.
Install essential software next: antivirus (if you prefer third-party), your web browser, productivity tools, and any peripherals’ management software. Reinstall applications in the order that minimizes disruptions—start with core utilities, then add niche tools and games. Keep installers and license keys organized in a folder or password manager to simplify future reinstalls.
Finally, re-enable BitLocker or other encryption solutions after activation and updates. Set system restore points and configure backup schedules so you have a safety net. These small steps dramatically reduce grief if a later update or application change destabilizes the system.
Troubleshooting common installation errors
Installation errors usually fall into categories: media problems, hardware compatibility, storage configuration, or activation/licensing. If the installer won’t boot, test the USB on a different machine to rule out a corrupted image. If you encounter error codes during file copying or setup, note the code and consult Microsoft’s support library—many codes map to straightforward fixes like reformatting or driver removal.
Drive-related errors often stem from mismatched partition tables (MBR vs GPT) or RAID/Intel RST drivers. Switching the controller to AHCI in UEFI or loading the appropriate storage driver during setup usually resolves these issues. When upgrading, incompatible third-party drivers can cause hangs; booting into safe mode and removing those drivers can allow the upgrade to proceed.
Activation issues frequently occur when hardware has changed significantly since the license was issued. Use the Activation Troubleshooter or link your Microsoft account to the digital license before major hardware swaps. If online activation still fails, Microsoft support can usually reassign a license after verifying purchase and ownership details.
Advanced topics: dual boot, virtual machines, and recovery options
Dual-boot setups let you run multiple operating systems on the same machine but require careful partition planning and a clear bootloader strategy. Install Windows first when pairing it with Linux; Windows tends to overwrite existing bootloaders, so installing Windows before other OSs avoids extra repair steps. Keep a recovery USB for each OS to repair boot issues if they arise.
Virtual machines offer an alternative to dual booting and are particularly useful for testing installations or running legacy software. Tools like Hyper-V, VirtualBox, and VMware let you create isolated environments without touching your primary drive. Using snapshots in a VM can save hours by rolling back a faulty experiment instantly.
Create a recovery partition or an external recovery drive after a successful installation. Windows’ built-in recovery tools and third-party imaging solutions let you restore a system quickly without repeating all configuration steps. For critical systems, maintain an off-site image copy to defend against theft, fire, or catastrophic hardware failure.
Maintenance and optimization after installation
Fresh installs perform best when followed by a short maintenance routine. Disable or remove bloatware, uninstall unnecessary startup apps, and configure power settings for the way you use the machine. For laptops, balance battery life and performance; for desktops, set a high-performance profile if you rely on heavy computing tasks.
Keep drivers updated but avoid chasing every release immediately—driver updates can introduce instability in some cases. Use driver rollbacks if a new driver creates problems, and monitor vendor forums for reports before applying major changes. Regularly check for firmware updates for SSDs and BIOS/UEFI updates from the manufacturer; those updates often fix subtle stability or security issues.
Schedule periodic Backup & Formatting reviews: verify backups, refresh them if storage media ages, and test recovery steps. A working restore from your backup is the strongest guarantee that a future installation or failure won’t cost you important data.
Real-world tips from long-term installs
In my experience managing multiple machines over several years, the combination of a tested backup and a modest disk partition strategy saved work countless times. I once migrated a family of laptops to SSDs by cloning and then performing a clean Installation to remove legacy drivers. That hybrid approach kept user files intact while making the OS lean and responsive.
Another pragmatic habit: maintain a small, bootable toolkit USB with the most recent Media Creation Tool, a Linux live image for file recovery, and a copy of your common utilities. When a friend’s laptop refused to boot after a Windows Update, the toolkit allowed me to extract critical photos and perform an offline repair without a lengthy download.
Finally, treat activation and licensing as part of the project plan—not an afterthought. I once delayed finding a Genuine Windows Key until the end of a multi-day install, which caused unnecessary downtime. Start with keys, accounts, and recovery credentials ready so the final steps are simple and fast.
Checklist: quick reference for a smooth installation
Use this ordered list as a preflight checklist to keep installations predictable and low-risk.
- Verify hardware meets requirements and check manufacturer firmware updates.
- Create two backups: one file-level and one image-based.
- Gather licenses, Microsoft account info, and the Genuine Windows Key.
- Create and test bootable USB installation media.
- Configure UEFI/BIOS for UEFI, Secure Boot, and TPM as needed.
- Decide clean install vs upgrade and prepare partitions accordingly.
- Run the installer, complete activation, and apply updates and drivers.
- Set backups and recovery options after installation completes.
Following this checklist reduces guesswork and ensures you can recover quickly if something goes wrong. Treat the list as a living document and adapt it to your environment and specific hardware quirks.
Installing Windows 10 or Windows 11 is rarely a mystery when you prepare deliberately: verify hardware, secure your data with Backup & Formatting plans, use official media, and keep your Genuine Windows Key and account information handy. Whether you choose a clean Installation for a fresh start or an upgrade to preserve settings, the steps above will help you move confidently and reduce downtime. If you encounter unusual errors, document them, consult vendor resources, and remember that most issues have straightforward fixes learned from experience.




Reviews
There are no reviews yet.